Sunday, April 10, 2011

Cement Mixer Update

The cement mixer is finally breathing! I met the short term team that brought the pulleys over at the airport at 2:30 the other morning, and after a bit of adapting, we've got things going! The big main pulley fit just right - thanks to the $25 micrometer that was sent over in the last container! We did need to do a bit of work to make the key stock that keeps the pulley from slipping on the shaft, but half an hour on the bench grinder turned a chunk of rebar into a pretty well fitted section of square key stock!


Sometimes you just have to do what you can...


A near perfect fit!

The motor we're using was donated and sent over in the container a couple of years ago. It was crated, and didn't want to start when I opened it up. After taking apart and cleaning the carb, it seems to be running pretty well. The pulley we bought for the motor is the wrong size because the supplier I found at the last minute didn't have metric sized pulleys like the motor's shaft is. So, we did a little careful bending of a piece of sheet metal and it did a great job of filling in the gap between the 20mm shaft and the 7/8" pulley opening!

Not bad!

We found and cleaned up the nameplate on it, it's an Italian machine (Dieci) from 1989. It looks pretty good for its age - and it's getting ready to start its second life, for us.

All we need to do now is patch a couple of rusted spots of sheet metal and find/adapt some wheels for it!

Tuesday, April 5, 2011

Prepping the pillars

Now that the holes are dug, we're moving on to the next step. I've never been around commercial/concrete construction in the States, so I'm not sure how we'd do this part there, but the last couple of days the workers have been cutting, bending, and tieing rebar together by hand to make the steel skeletons that will be poured around to make the pillars.


This is how the skeletons end up

They cut all of the chunks of rebar apart with a hacksaw and vice, then bend the chunks using a steel bar with a notched head at the end that grabs the rebar, and finally use wire to tie all of the pieces together.


The next step will be to build wooden forms, stand the skeletons up in the holes and fill the footings in with rocks and concrete. After that, to make the pillars, they'll nail the wooden cement forms around the skeletons, and then start filling the form with bucket after bucket of cement dumped into the top of the form, until it's full. Hopefully the cement mixer will be ready to roll by the time we get to that point!

Cement Mixer

Once the decision was made that we couldn't get material strong enough to make the two story solar support structure out of steel, we had to revert to the way things are usually done here - reinforced concrete. The normal way of doing small concrete jobs here is to mix the gravel, sand, water, and cement together on the ground with shovels. That works fine if you have time and don't mind the concrete being incompletely mixed and thus weaker. Given that these pillars need to hold up the weight of a pair of cars, that's not going to cut it here even if we had forever to work that way. So, given that we already had a donated motor just waiting for a cement mixer to be used in, and that it costs $80 a day to rent a small mixer or $3000 to buy a new one, we started looking for one we could rehabilitate for this and the many other foundations we'll need to pour for the block maker's various projects in the future.

Fortunately, after several weeks of asking around, our main construction guy, Nilton, got a line on one out on the islands that had been stripped and was sitting unused. He made a deal with the owner of the shell, and for $190 we had ourselves a pretty decent sized mixer that needed some TLC, brought in on a canoe from the islands!


There's a good amount of rust on it, and it's missing the pulleys and motor needed to drive it, but fortunately all of the important parts like the mixing drum, gears, and bearings, seem to be in pretty decent shape!

After sanding it all down, the workers hit it with a coat of primer and some good enamel, and now it's looking pretty good!

The last big piece of the puzzle was to find the proper pulleys to reduce the speed of the generator motor we have to make work with the mixer. After searching around in the used parts market here (which is mostly parts taken off of cars) we realized that finding a pair of pulleys with the correct diameter to gear up the motor to be able to spin the mixer drum and with the correct shaft diameter was like looking for a pair of matching needles in a haystack. I thought about heading down to the local Grainger or McMaster-Carr to pick them up, but... alas, there are none. :) We didn't have time to wait for the mail, and UPS could've gotten the $50 parts here for about $400, which also didn't seem like a good option.

Fortunately, we heard about a short term team coming over, and they very graciously agreed to surrender 20 lbs of their luggage allowance to bring the parts over this week! We'll be ready to hit cement production hard next week, so hopefully we'll get the parts and get the mixer fixed before we even miss it!

Friday, April 1, 2011

Solar Project Begins

In preparation for the solar system, we're starting to build the structure where we'll mount all of the panels! We looked in every corner of the youth center to find the best spot for the panels, but since they're going to occupy either 30x42' or 30x72' depending on how we lay them out, it's not like you can shove them just anywhere! We needed just the right spot, where they'd be high enough to be safe from mischief, far enough away from the edge of the youth center to be safe from thieves, and never in any shade. We're also trying to balance the desire for the perfect spot against the cost savings of using an existing roof or building that isn't as ideal.

We had planned (and budgeted) to put the system on the roof of our house all along, but when we arrived and talked to the mason that built the house, we found out the foundation wasn't strong enough to support all of the weight, so we beg
an our hunt for a new location. In the end, we came up with just about the only spot in the center that fulfills all of our requirements.

The back section of the youth center is the guesthouse, and the yard in front of the guesthouse is going to be our spot. The yard is beautiful and green in a city with lots of dirt and dust, so we're doing everything we can to minimize the appearance that the solar system is taking over the yard. We'll be building a cement support structure of pillars to hold the system up, which will connect to the front of the guesthouse, and give us a place to mount the panels at the same height as the roof of the guesthouse, but out over the yard in front of it.

Here's the guesthouse before we got started.

This is the basic idea, but now that we decided to use cement instead of steel we'll also have to put connecting horizontal beams all the way around at the half height altitude as well as the ones on top that are in the diagram. We would've preferred steel, but there isn't anything tough enough available here.

The decision about whether to occupy 30x42' or 30x75' depends on how much there is to be gained by building the system to rotate to follow the sun througout the day. After lots of searching online, I haven't found a clear answer, so we're keeping our options open. We're going to build to the smaller size with the option of expanding. When the panels arrive, we'll do a test for a few days to compare the amount of energy collected by a couple of fixed panels compared to a couple next to them that follow the sun. Once we know how much improvement we're talking about gaining by following the sun, we'll be able to evaluate if it's worth the extra expense and complication to do so or not. If it's 2%, we'll be sticking with the much simpler and cheaper fixed method. If the number were closer to 30% extra energy, we'd have to think hard about if we want to leave that much generating capacity on the table, given how expensive the panels are in the first place.

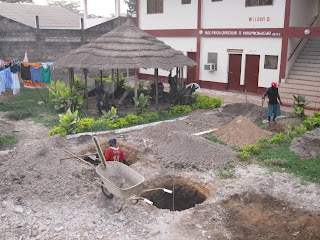
So, in the first phase we'll be building four of those six rows of columns. If we need to add on later, we'll go back and build the other two to get our full 75'. The first step is digging some deep footings, to make sure the system has a solid foundation. The workers dug eight holes that are five feet deep and a bit over three feet across!